This is my last post on Blogger. I have decided to switch to Medium, a great and simple blogging platform.
My future post will be available here: https://medium.com/@OlegVaraksin
Thanks!
Saturday, August 27, 2016
Monday, May 30, 2016
Lazy inter-module communication with require() and webpack
Motivation
CommonJS' modules can be loaded on demand with require.ensure(...). Example:
Webpack performs a static analysis of the code at the project build time. Dynamic information is only available at runtime and not available at build time. You have to define your modules as constants. This leads to the problem. The following code will not work:
Theoretically you can use require.context, but this needs some parts of module's path as constants too. Now, imagine you develop a modular UI library and would like to provide some callbacks for certain events (event handlers). Users of your library use it as a third-party library. They want to register their custom callback functions from their own modules. And they want to be called lazy, on demand, when an event occurs. You have many users and your library doesn't know about custom modules of course. That means, you can not hard-code module's path and function's name a priori. What to do?
Solution
This POC on GitHub demonstrates how to use truly dynamic require with webpack. It simulates third-party and own modules. The project structure:
The HTML template in the POC, backed by the third-party (external) modules, look like as follows (only short snippet):
The module's functions in the folder own-modules returns Promises. Promises allow asynchronous callbacks. In the POC, the NPM module promise light is used. If you have jQuery in your web app, you can use jQuery Deferred Object as well because it provides the same functionality. The sample implementation of the button.js looks like as
Screens
The initial load doesn't fetch chunks from the own modules.
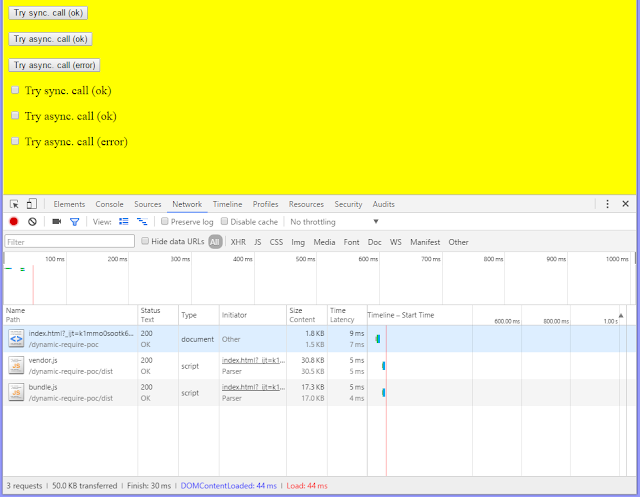
Click on a button triggers the load of the first chunk.
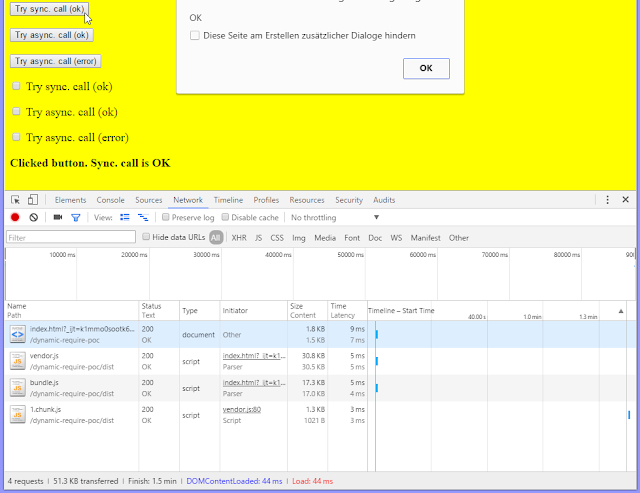
Click on a checkbox triggers the load of the second chunk.

CommonJS' modules can be loaded on demand with require.ensure(...). Example:
require.ensure(["module-a"], function(require) {
    var a = require("module-a");
    // module-a can be used now ...
});
The well-known module bundler Webpack supports this syntax for loading modules on demand. Such lazy loaded module(s) define a split point. Split points split the codebase into "chunks" (separate JavaScript files) which are loaded on demand. This feature allows to keep the initial download small and only download the code when it's requested.Webpack performs a static analysis of the code at the project build time. Dynamic information is only available at runtime and not available at build time. You have to define your modules as constants. This leads to the problem. The following code will not work:
var modA = "module-a";
require.ensure([modA], function(require) {
    var a = require("module-a");
    // module-a can be used now ...
});
Webpack says something like: Error: Module not found. A dependency to an entry point is not allowed.Theoretically you can use require.context, but this needs some parts of module's path as constants too. Now, imagine you develop a modular UI library and would like to provide some callbacks for certain events (event handlers). Users of your library use it as a third-party library. They want to register their custom callback functions from their own modules. And they want to be called lazy, on demand, when an event occurs. You have many users and your library doesn't know about custom modules of course. That means, you can not hard-code module's path and function's name a priori. What to do?
Solution
This POC on GitHub demonstrates how to use truly dynamic require with webpack. It simulates third-party and own modules. The project structure:
index.html          // some HTML template from the third-party UI library
external-modules    // third-party library with CommonJS modules
own-modules         // some library with CommonJS modules which uses the third-party library
common-modules      // simple utility modules
The modules in external-modules don't know about own-modules. Modules in the own-modules import modules from the external-modules. The most important webpack loader we use in this POC is bundle loader for webpack. This loader creates a special function with required module which can be executed lazily. The required module gets loaded when the function is executed.
The HTML template in the POC, backed by the third-party (external) modules, look like as follows (only short snippet):
<button data-init="button" data-onclick='["ownModules.button", "alertSync"]'>
    Try sync. call (ok)
</button>
<p></p>
<button data-init="button" data-onclick='["ownModules.button", "alertAsyncValid"]'>
    Try async. call (ok)
</button>
<p></p>
<button data-init="button" data-onclick='["ownModules.button", "alertAsyncInvalid"]'>
    Try async. call (error)
</button>
The full code can be found in index.xhtml. The callback functions are defined as values of data-* attributes. Example: data-onclick='["ownModules.button", "alertSync"]'. Here, the function alertSync from the namespace ownModules.button wants to be called when the button is clicked. The namespace is a simple JavaScript object defined in the global window scope.The module's functions in the folder own-modules returns Promises. Promises allow asynchronous callbacks. In the POC, the NPM module promise light is used. If you have jQuery in your web app, you can use jQuery Deferred Object as well because it provides the same functionality. The sample implementation of the button.js looks like as
var Promise = require('promise-light');

module.exports = {
    alertSync: function (element) {
        document.getElementById('output').innerHTML = 'Clicked button. Sync. call is OK';
        return Promise.resolve('OK');
    },

    alertAsyncValid: function (element) {
        return new Promise(function setup(resolve, reject) {
            setTimeout(function () {
                document.getElementById('output').innerHTML = 'Clicked button. Async. call is OK';
                resolve('OK');
            }, 1000);
        });
    },

    alertAsyncInvalid: function (element) {
        return new Promise(function setup(resolve, reject) {
            setTimeout(function () {
                document.getElementById('output').innerHTML = 'Clicked button. Async. call has ERROR';
                reject('ERROR');
            }, 1000);
        });
    }
};
The external modules should be bootstrapped by the own modules. The bootstrapping occurs in the file entry.js which acts as an entry point in the webpack configuration.
var objectifier = require("./../common-modules/objectifier");
var bootstrap = require("./../external-modules/bootstrap");

document.addEventListener("DOMContentLoaded", function (event) {
    // initialize external modules
    bootstrap.bootstrap();

    // lazy load own modules (s. https://github.com/webpack/bundle-loader)
    var lazyLoadedButton = require("bundle?lazy!./button");
    var lazyLoadedCheckbox = require("bundle?lazy!./checkbox");

    // and put them under namespaces ownModules.button and ownModules.checkbox resp.
    objectifier.set('ownModules.button', lazyLoadedButton);
    objectifier.set('ownModules.checkbox', lazyLoadedCheckbox);
});
As you can see, the bundle loader is applied to the own modules. The returned functions are saved under arbitrary namespaces in order to be executed later in external modules. Note: the objectifier is just a CommonJS module porting of the beautiful getter and setter implementation for nested objects.
The button.js in the external-modules registers an onlick event handler for all HTML elements having the data-init="button" attribute.
var lazyloader = require("./lazyloader");

module.exports = {
    init: function () {
        var elements = document.querySelectorAll('[data-init="button"]');
        for (var i = 0; i < elements.length; i++) {
            (function () {
                var element = elements[i];

                // onlick event handler
                var onclick = function () {
                    // so something module specific ...

                    // execute function defined via data-onclick attribute if it's defined,
                    // e.g. data-onclick='["ownModules.button", "alertSync"]'
                    lazyloader.execute(element, 'data-onclick',
                        function resolved(value) {
                            alert(value);
                        }, function rejected(error) {
                            alert(error);
                        });
                };

                element.addEventListener("click", onclick);
            })();
        }

        return elements;
    },

    doSomething: function () {
        // ...
    }
};
The core logic for the event handling is encapsulated in the lazyloader.js.
/**
 Loads modules specified via data-* attributes and executes the specified function.
 HTML-Example:

 <button data-init="button" data-onclick='["ownModules.button", "alertSync"]'>
    ...
 </button>

 The function ownModules.button.alertSync(button) will be executed.
 */

var objectifier = require("./../common-modules/objectifier");

module.exports = {
    /**
     * Executes the specified synchronous or asynchronous function from the specified module
     * and invokes resolved or rejected callbacks respectively.
     * The function should return a promise.
     *
     * @param element HTML element where data-* is defined
     * @param data value of data-* as string
     * @param resolvedCallback callback which gets executed when the returned promise is fullfilled
     * @param rejectedCallback callback which gets executed when the returned promise is rejected
     */
    execute: function (element, data, resolvedCallback, rejectedCallback) {
        var strData = element.getAttribute(data);
        if (strData) {
            var objData = JSON.parse(strData);
            var module = objData[0];
            var func = objData[1];

            if (module && objectifier.exists(module) && func) {
                // module and function exist ==> load the module
                objectifier.get(module)(function (module) {
                    // execute the specified function from the module.
                    // return value is a promise (see https://www.npmjs.com/package/promise-light)
                    module[func](element).then(
                        function resolved(value) {
                            resolvedCallback(value);
                        },
                        function rejected(error) {
                            rejectedCallback(error);
                        });
                });
            }
        }
    }
};
It executes the specified function from the specified module. The caller receives a promise. If the promise gets resolved, the first function in .then(...) is executed. If the promise gets rejected, the second function in .then(...) is executed. The synchronous or asynchronous function from the own modules can control whether it resolves or rejects the promise. The caller can decide then what it should do in both cases. For instance, assume you got an accordion widget which belongs to a third-party library. One interesting case could be the validation of the content of an open accordion tab when the tab's header is clicked by the user. A custom function could validate the tab content on such click. In case of a successful validation, the clicked tab can be closed. Otherwise, the tab should stay open.Screens
The initial load doesn't fetch chunks from the own modules.

Click on a button triggers the load of the first chunk.

Click on a checkbox triggers the load of the second chunk.

Sunday, May 15, 2016
NPM module Browser-Sync in Java / Web projects
Browser-Sync is a handy Node.js based NPM module which can be used for a faster web development. Browser-Sync synchronizes file changes and interactions across many devices. The most important feature is the live reloading. We can use the Browser-Sync in Java / Web projects too. Cagatay Civici created a great video tutorial how to use this module with the PrimeFaces showcase. The PrimeFaces showcase has a built-in Jetty server which looks to the source folder src/main/webapp as the web context root. After the Browser-Sync installation via the Node.js package manager NPM
This approach works well until you have made changes in Java files. Java files are not web resources under src/main/webapp. In Maven projects they located under src/main/java. That means, changes in Java files will not be recognized. The solution is exploded WAR. An exploded WAR is a directory where the web application gets deployed from. Every application server can deploy an exploded WAR. For Maven projects, this directory is normally target/webapp. The Maven WAR plugin has the goal war:exploded too. If you have an IDE, you can configure your web application as an exploded WAR. I have blogged about Hot Deployment with IntelliJ IDEA a couple of years ago. In IntelliJ, you can automatically copy changed files (CSS, JS, HTML resources and compiled Java files) to the directory for the exploded WAR.

Now, if you refresh the browser manually, you will see the changes in Java classes too. But we want to do this better. We want to use the highly praised live reloading! To achieve this goal, set files to be watched as follows
I can also imagine some complex Gulp tasks, such as compiling Java classes in dependent JAR files, build JARs and copy them to the WEB-INF/lib folder of the exploded WAR.
npm install -g browser-syncwe have to start the Jetty server for the PrimeFaces showcase at http://localhost:8080/showcase. Afther that we can use this URL as proxy for a built-in server included in the Browser-Sync. The Browser-Sync should listen to changes under src/main/webapp
browser-sync start --proxy "http://localhost:8080/showcase" --files "src/main/webapp/**/*"As result, a default browser will be started at http://localhost:3000/showcase with the PrimeFaces showcase. The port 3000 is the default port for the Browser-Sync.
This approach works well until you have made changes in Java files. Java files are not web resources under src/main/webapp. In Maven projects they located under src/main/java. That means, changes in Java files will not be recognized. The solution is exploded WAR. An exploded WAR is a directory where the web application gets deployed from. Every application server can deploy an exploded WAR. For Maven projects, this directory is normally target/webapp. The Maven WAR plugin has the goal war:exploded too. If you have an IDE, you can configure your web application as an exploded WAR. I have blogged about Hot Deployment with IntelliJ IDEA a couple of years ago. In IntelliJ, you can automatically copy changed files (CSS, JS, HTML resources and compiled Java files) to the directory for the exploded WAR.

Now, if you refresh the browser manually, you will see the changes in Java classes too. But we want to do this better. We want to use the highly praised live reloading! To achieve this goal, set files to be watched as follows
browser-sync start --proxy "http://localhost:8080/showcase" --files "target/classes/**/*.class, target/webapp/**/*"The output looks like
[BS] Proxying: http://localhost:8080
[BS] Access URLs:
 ---------------------------------------------------------------------
       Local: http://localhost:3000/showcase
    External: http://192.168.178.27:3000/showcase
 ---------------------------------------------------------------------
          UI: http://localhost:3001
 UI External: http://192.168.178.27:3001
 ---------------------------------------------------------------------
Now, I can do any changes in all important files and see something like in the console
[BS] Watching files...
[BS] File changed: target\webapp\META-INF\MANIFEST.MF
[BS] File changed: target\webapp\WEB-INF\classes\some\showcase\bean\SomeBean.class
[BS] File changed: target\webapp\views\someView.xhtml
[BS] File changed: target\webapp\META-INF\MANIFEST.MF
The browser page gets updated by the Browser-Sync automatically (which uses WebSockets by the way). If you have trouble with your IDE, you can use Gulp to rescue! Here my idea for a gulpfile.js (Gulp 4).
var browsersync = require('browser-sync').create();

// init Browser-Sync
gulp.task('browser-sync', function() {
    browsersync.init({
        proxy: "http://localhost:8080/showcase"
    });
});

// compile changed Java files by Maven "mvn compile"
// compiled classes will be transfered to target/classes automatically
gulp.task('java', function () {
    // use 'spawn' to execute command using Node.js
    var spawn = require('child_process').spawn;

    // set the working directory to project root where gulpfile.js exists
    process.chdir(__dirname);

    // run "mvn compile"
    var child = spawn('mvn', ['compile']);

    // print output
    child.stdout.on('data', function(data) {
        if (data) {
            console.log(data.toString());
        }
    });
});

// copy changes from src/main/webapp to target/webapp
gulp.task('webapp', function () {
    return gulp.src('src/main/webapp/**/*', {since: gulp.lastRun('webapp')})
        .pipe(gulp.dest('target/webapp'));
});

// watch files for changes
gulp.task('watch', function () {
    gulp.watch('src/main/java/**/*.java', gulp.series('java'));
    gulp.watch('src/main/webapp/**/*', gulp.series('webapp'));
    gulp.watch(['target/classes/**/*.class', 'target/webapp/**/*'], browsersync.reload);
});

// default task
gulp.task('default', gulp.series('browser-sync', 'watch'));
This file should be placed in the project root folder. Now, you are able to execute the command (Gulp should be installed of course)
gulpand enjoy the live reloading! Please consider, the Gulp java task. Maven only compiles changed files. It works very fast! Without changes there are nothing to be compiled - the output of the mvn compile looks like:
[INFO] Nothing to compile - all classes are up to dateIf we make a change in one Java file, the output looks like:
[INFO] Compiling 1 source file to <path>\showcase\target\classesNote: The server should run in reloadable mode. E.g. Tomcat has a reloadable option in context.xml. Set it to true to force monitoring classes in /WEB-INF/classes/ and /WEB-INF/lib for changes and automatically reload the web application if a change is detected. JBoss has this feature automatically if you start it in the debug mode.
I can also imagine some complex Gulp tasks, such as compiling Java classes in dependent JAR files, build JARs and copy them to the WEB-INF/lib folder of the exploded WAR.
Sunday, April 3, 2016
Clean architecture of Selenium tests
In this blog post, I would like to introduce a clean architecture for Selenium tests with best design patterns: page object, page element (often called HTML wrapper) and self-developed, very small but smart framework. The architecture is not restricted to Java which is used in the examples and can be applied to Selenium tests in any other language as well.
Definitions and relations.
Page Object. A page object encapsulates the behavior of a web page. There is one page object per web page that abstracts the page's logic to the outside. That means, the interaction with the web page is encapsulated in the page object. Selenium's By locators to find elements on the page are not disclosed to the outside as well. The page object's caller should not be busy with the By locators, such as By.id, By.tageName, By.cssSelector, etc. Selenium test classes operate on page objects. Take an example from a web shop: the page object classes could be called e.g. ProductPage, ShoppingCartPage, PaymentPage, etc. These are always classes for the whole web pages with their own URLs.
Page Element (aka HTML Wrapper). A page element is another subdivision of a web page. It represents a HTML element and encapsulates the logic for the interaction with this element. I will term a page element as HTML wrapper. HTML wrappers are reusable because several pages can incorporate the same elements. For instance, a HTML wrapper for Datepicker can provide the following methods (API): "set a date into the input field", "open the calendar popup", "choose given day in the calendar popup", etc. Other HTML wrappes would be e.g. Autocomplete, Breadcrumb, Checkbox, RadioButton, MultiSelect, Message, ... A HTML Wrapper can be composite. That means, it can consist of multiple small elements. For instance, a product catalog consists of products, a shopping cart consists of items, etc. Selenium's By locators for the inner elements are encapsulated in the composite page element.
Page Object and HTML Wrappers as design patterns were described by Martin Fowler.
The skeletal structure of a Selenium test class.
A test class is well structured. It defines the test sequence in form of single process steps. I suggest the following structure:
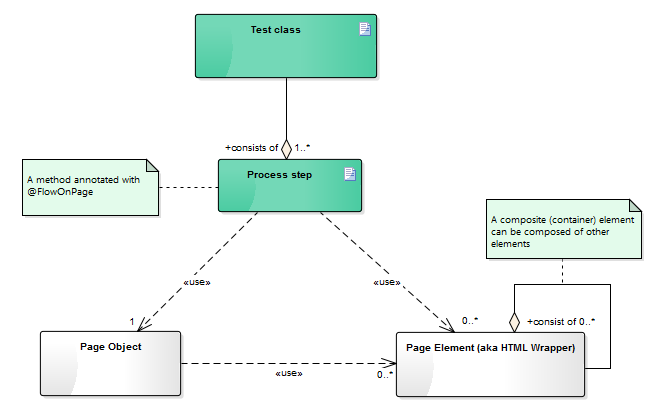
But stop. Where is the JUnit method annotated with @Test and where is the logic for the parsing of @FlowOnPage annotation? That code is hidden in the super class AbstractSeleniumTest.
The structure of a Page Object.
Every page object class inherits from the class LoadablePage which inherits again from the Selenium's class LoadableComponent. A good explanation for LoadableComponent is available in this well written article: Simple and advanced usage of LoadableComponent. LoadablePage is our own class, implemented as follows:
But ok, let me show the test class. In the test class, we want to test if a hint appears in the shopping cart when a child under 16 years travels without parents. Firts of all, we have to type the stations "from" and "to", click on a desired connection in the timetable and add a child on the next page which shows travel offers for the choosen connection.
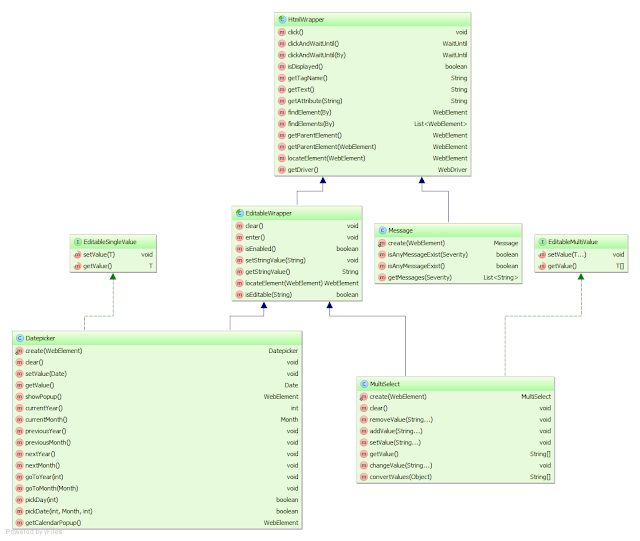
The structure of a HTML Wrapper.
I suggest to create an abstract base class for all HTML wrappers. Let's call it HtmlWrapper. This class can provide some common methods, such as click, clickAndWaitUntil, findElement(s), getParentElement, getAttribute, isDisplayed, ... For editable elements, you can create a class EditableWrapper which inherits from the HtmlWrapper. This class can provide some common methods for editable elements, such as clear (clears the input), enter (presses the enter key), isEnabled (checks if the element is enabled), ... All editable elements should inherit from the EditableWrapper. Futhermore, you can provide two interfaces EditableSingleValue and EditableMultipleValue for single and multi value elements respectively. The next diagram demonstrates the idea. It shows the class hierarchy for three basic HTML wrappes:
Datepicker. It inherits from the EditableWrapper and implements the EditableSingleValue interface.
MultiSelect. It inherits from the EditableWrapper and implements the EditableMultiValue interface.
Message. It extends directly the HtmlWrapper because a message is not editable.
Do you want more implementation details for HTML wrappers? Details for an jQuery Datepicker can be found for example in this great article. The MultiSelect is a wrapper around the famous Select2 widget. I have implemented the wrapper in my project in the following way:
Conclusion: when you finished the writing of page objects and HTML wrappers, you can settle back and concentrate on the comfortable writing of Selenium tests. Feel free to share your thoughts.
Definitions and relations.
Page Object. A page object encapsulates the behavior of a web page. There is one page object per web page that abstracts the page's logic to the outside. That means, the interaction with the web page is encapsulated in the page object. Selenium's By locators to find elements on the page are not disclosed to the outside as well. The page object's caller should not be busy with the By locators, such as By.id, By.tageName, By.cssSelector, etc. Selenium test classes operate on page objects. Take an example from a web shop: the page object classes could be called e.g. ProductPage, ShoppingCartPage, PaymentPage, etc. These are always classes for the whole web pages with their own URLs.
Page Element (aka HTML Wrapper). A page element is another subdivision of a web page. It represents a HTML element and encapsulates the logic for the interaction with this element. I will term a page element as HTML wrapper. HTML wrappers are reusable because several pages can incorporate the same elements. For instance, a HTML wrapper for Datepicker can provide the following methods (API): "set a date into the input field", "open the calendar popup", "choose given day in the calendar popup", etc. Other HTML wrappes would be e.g. Autocomplete, Breadcrumb, Checkbox, RadioButton, MultiSelect, Message, ... A HTML Wrapper can be composite. That means, it can consist of multiple small elements. For instance, a product catalog consists of products, a shopping cart consists of items, etc. Selenium's By locators for the inner elements are encapsulated in the composite page element.
Page Object and HTML Wrappers as design patterns were described by Martin Fowler.
The skeletal structure of a Selenium test class.
A test class is well structured. It defines the test sequence in form of single process steps. I suggest the following structure:
public class MyTestIT extends AbstractSeleniumTest {

    @FlowOnPage(step = 1, desc = "Description for this method")
    void flowSomePage(SomePage somePage) {
        ...
    }

    @FlowOnPage(step = 2, desc = "Description for this method")
    void flowAnotherPage(AnotherPage anotherPage) {
        ...
    }

    @FlowOnPage(step = 3, desc = "Description for this method")
    void flowYetAnotherPage(YetAnotherPage yetAnotherPage) {
        ...
    }

    ...
}
The class MyTestIT is an JUnit test class for an integration test. @FlowOnPage is a method annotation for the test logic on a web page. The step parameter defines a serial number in the test sequence. The numeration starts with 1. That means, the annotated method with the step = 1 will be processed before the method with the step = 2. The second parameter desc stands for description what the method is doing.
@Target(ElementType.METHOD)
@Retention(RetentionPolicy.RUNTIME)
public @interface FlowOnPage {

    int step() default 1;

    String desc();
}
The annotated method is invoked with a page object as method parameter. A switch to the next page normally occurs per click on a button or link. The developed framework should make sure that the next page is completely loaded before the annotated method with next step gets called. The next diagram illustrates the relationship between a test class, page objects and HTML wrappers.But stop. Where is the JUnit method annotated with @Test and where is the logic for the parsing of @FlowOnPage annotation? That code is hidden in the super class AbstractSeleniumTest.
public abstract class AbstractSeleniumTest {

    // configurable base URL
    private final String baseUrl = System.getProperty("selenium.baseUrl", "http://localhost:8080/contextRoot/");

    private final WebDriver driver;

    public AbstractSeleniumTest() {
        // create desired WebDriver
        driver = new ChromeDriver();

        // you can also set here desired capabilities and so on
        ...
    }

    /**
     * The single entry point to prepare and run test flow.
     */
    @Test
    public void testIt() throws Exception {
        LoadablePage lastPageInFlow = null;
        List <Method> methods = new ArrayList<>();

        // Seach methods annotated with FlowOnPage in this and all super classes
        Class c = this.getClass();
        while (c != null) {
            for (Method method: c.getDeclaredMethods()) {
                if (method.isAnnotationPresent(FlowOnPage.class)) {
                    FlowOnPage flowOnPage = method.getAnnotation(FlowOnPage.class);
                    // add the method at the right position
                    methods.add(flowOnPage.step() - 1, method);
                }
            }

            c = c.getSuperclass();
        }

        for (Method m: methods) {
            Class<?>[] pTypes = m.getParameterTypes();

            LoadablePage loadablePage = null;
            if (pTypes != null && pTypes.length > 0) {
                loadablePage = (LoadablePage) pTypes[0].newInstance();
            }

            if (loadablePage == null) {
                throw new IllegalArgumentException("No Page Object as parameter has been found for the method " +
                    m.getName() + ", in the class " + this.getClass().getName());
            }

            // initialize Page Objects Page-Objekte and set parent-child relationship
            loadablePage.init(this, m, lastPageInFlow);
            lastPageInFlow = loadablePage;
        }

        if (lastPageInFlow == null) {
            throw new IllegalStateException("Page Object to start the test was not found");
        }

        // start test
        lastPageInFlow.get();
    }

    /**
     * Executes the test flow logic on a given page.
     *
     * @throws AssertionError can be thrown by JUnit assertions
     */
    public void executeFlowOnPage(LoadablePage page) {
        Method m = page.getMethod();
        if (m != null) {
            // execute the method annotated with FlowOnPage
            try {
                m.setAccessible(true);
                m.invoke(this, page);
            } catch (Exception e) {
                throw new AssertionError("Method invocation " + m.getName() +
                    ", in the class " + page.getClass().getName() + ", failed", e);
            }
        }
    }

    @After
    public void tearDown() {
        // close browser
        driver.quit();
    }

    /**
     * This method is invoked by LoadablePage.
     */
    public String getUrlToGo(String path) {
        return baseUrl + path;
    }

    public WebDriver getDriver() {
        return driver;
    }
}
As you can see, there is only one test method testIt which parses the annotations, creates page objects with relations and starts the test flow.The structure of a Page Object.
Every page object class inherits from the class LoadablePage which inherits again from the Selenium's class LoadableComponent. A good explanation for LoadableComponent is available in this well written article: Simple and advanced usage of LoadableComponent. LoadablePage is our own class, implemented as follows:
import org.openqa.selenium.support.ui.WebDriverWait;
import org.junit.Assert;
import org.openqa.selenium.By;
import org.openqa.selenium.Keys;
import org.openqa.selenium.WebDriver;
import org.openqa.selenium.WebElement;
import org.openqa.selenium.interactions.Actions;
import org.openqa.selenium.support.PageFactory;
import org.openqa.selenium.support.ui.ExpectedCondition;
import org.openqa.selenium.support.ui.LoadableComponent;
import org.openqa.selenium.support.ui.WebDriverWait;
import org.slf4j.Logger;
import org.slf4j.LoggerFactory;
import java.lang.reflect.Method;
import java.util.List;

public abstract class LoadablePage<T extends LoadableComponent<T>> extends LoadableComponent<T> {

    private final static Logger LOGGER = LoggerFactory.getLogger(LoadablePage.class);

    private AbstractSeleniumTest seleniumTest;
    private String pageUrl;
    private Method method;
    private LoadablePage parent;

    /**
     * Init method (invoked by the framework).
     *
     * @param seleniumTest instance of type AbstractSeleniumTest
     * @param method to be invoked method annotated with @FlowOnPage
     * @param parent parent page of type LoadablePage
     */
    void init(AbstractSeleniumTest seleniumTest, Method method, LoadablePage parent) {
        this.seleniumTest = seleniumTest;
        this.pageUrl = seleniumTest.getUrlToGo(getUrlPath());
        this.method = method;
        this.parent = parent;

        PageFactory.initElements(getDriver(), this);
    }

    /**
     * Path of the URL without the context root for this page.
     *
     * @return String path of the URL
     */
    protected abstract String getUrlPath();

    /***
     * Specific check which has to be implemented by every page object.
     * A rudimentary check on the basis of URL is undertaken by this class.
     * This method is doing an extra check if the page has been proper loaded.
     *
     * @throws Error thrown when the check fails
     */
    protected abstract void isPageLoaded() throws Error;

    @Override
    protected void isLoaded() throws Error {
        // min. check against the page URL
        String url = getDriver().getCurrentUrl();
        Assert.assertTrue("You are not on the right page.", url.equals(pageUrl));

        // call specific check which has to be implemented on every page
        isPageLoaded();
    }

    @Override
    protected void load() {
        if (parent != null) {
            // call the logic in the parent page
            parent.get();

            // parent page has navigated to this page (via click on button or link).
            // wait until this page has been loaded.
            WebDriverWait wait = new WebDriverWait(getDriver(), 20, 250);
            wait.until(new ExpectedCondition<Boolean> () {
                @Override
                public Boolean apply(WebDriver d) {
                    try {
                        isLoaded();
                        return true;
                    } catch (AssertionError e) {
                        return false;
                    }
                }
            });
        } else {
            // Is there no parent page, the page should be navigated directly
            LOGGER.info("Browser: {}, GET {}", getDriver(), getPageUrl());
            getDriver().get(getPageUrl());
        }
    }

    /**
     * Ensure that this page has been loaded and execute the test code on the this page.
     *
     * @return T LoadablePage
     */
    public T get() {
        T loadablePage = super.get();

        // execute flow logic
        seleniumTest.executeFlowOnPage(this);

        return loadablePage;
    }

    /**
     * See {@link WebDriver#findElement(By)}
     */
    public WebElement findElement(By by) {
        return getDriver().findElement(by);
    }

    /**
     * See {@link WebDriver#findElements(By)}
     */
    public List<WebElement> findElements(By by) {
        return getDriver().findElements(by);
    }

    public WebDriver getDriver() {
        return seleniumTest.getDriver();
    }

    protected String getPageUrl() {
        return pageUrl;
    }

    Method getMethod() {
        return method;
    }
}
As you can see, every page object class needs to implement two abstract methods:
/**
 * Path of the URL without the context root for this page.
 *
 * @return String path of the URL
 */
protected abstract String getUrlPath();

/***
 * Specific check which has to be implemented by every page object.
 * A rudimentary check on the basis of URL is undertaken by the super class.
 * This method is doing an extra check if the page has been proper loaded.
 *
 * @throws Error thrown when the check fails
 */
protected abstract void isPageLoaded() throws Error;
Now I would like to show the code for a concrete page object and a test class which tests the SBB Ticket Shop, so that readers can acquire a taste for testing with page objects. The page object TimetablePage contains HTML wrappers for basic elements.
public class TimetablePage extends LoadablePage<TimetablePage> {

    @FindBy(id = "...")
    private Autocomplete from;
    @FindBy(id = "...")
    private Autocomplete to;
    @FindBy(id = "...")
    private Datepicker date;
    @FindBy(id = "...")
    private TimeInput time;
    @FindBy(id = "...")
    private Button search;

    @Override
    protected String getUrlPath() {
        return "pages/fahrplan/fahrplan.xhtml";
    }

    @Override
    protected void isPageLoaded() throws Error {
        try {
            assertTrue(findElement(By.id("shopForm_searchfields")).isDisplayed());
        } catch (NoSuchElementException ex) {
            throw new AssertionError();
        }
    }

    public TimetablePage typeFrom(String text) {
        from.setValue(text);
        return this;
    }

    public TimetablePage typeTo(String text) {
        to.setValue(text);
        return this;
    }

    public TimetablePage typeTime(Date date) {
        time.setValue(date);
        return this;
    }

    public TimetablePage typeDate(Date date) {
        date.setValue(date);
        return this;
    }

    public TimetablePage search() {
        search.clickAndWaitUntil().ajaxCompleted().elementVisible(By.cssSelector("..."));
        return this;
    }

    public TimetableTable getTimetableTable() {
        List<WebElement> element = findElements(By.id("..."));
        if (element.size() == 1) {
            return TimetableTable.create(element.get(0));
        }

        return null;
    }
}
In the page object, HTML wrappers (simple or composite) can be created either by the @FindBy, @FindBys, @FindAll annotations or dynamic on demand, e.g. as TimetableTable.create(element) where element is the underlying WebElement. Normally, the annotations don't work with custom elements. They only work with the Selenium's WebElement per default. But it is not difficult to get them working with the custom elements too. You have to implement a custom FieldDecorator which extends DefaultFieldDecorator. A custom FieldDecorator allows to use @FindBy, @FindBys, or @FindAll annotations for custom HTML wrappers. A sample project providing implementation details and examples of custom elements is available here. You can also catch the Selenium's infamous StaleElementReferenceException in your custom FieldDecorator and recreate the underlying WebElement by the original locator. A framework user doesn't see then StaleElementReferenceException and can call methods on WebElement even when the referenced DOM element was updated in the meantime (removed from the DOM and added with a new content again). This idea with code snippet is available here.But ok, let me show the test class. In the test class, we want to test if a hint appears in the shopping cart when a child under 16 years travels without parents. Firts of all, we have to type the stations "from" and "to", click on a desired connection in the timetable and add a child on the next page which shows travel offers for the choosen connection.
public class HintTravelerIT extends AbstractSeleniumTest {

    @FlowOnPage(step = 1, desc = "Seach a connection from Bern to Zürich and click on the first 'Buy' button")
    void flowTimetable(TimetablePage timetablePage) {
        // Type from, to, date and time
        timetablePage.typeFrom("Bern").typeTo("Zürich");
        Date date = DateUtils.addDays(new Date(), 2);
        timetablePage.typeDate(date);
        timetablePage.typeTime(date);

        // search for connections
        timetablePage.search();

        // click on the first 'Buy' button
        TimetableTable table = timetablePage.getTimetableTable();
        table.clickFirstBuyButton();
    }

    @FlowOnPage(step = 2, desc = "Add a child as traveler and test the hint in the shopping cart")
    void flowOffers(OffersPage offersPage) {
        // Add a child
        DateFormat df = new SimpleDateFormat("dd.MM.yyyy", Locale.GERMAN);
        String birthDay = df.format(DateUtils.addYears(new Date(), -10));
        offersPage.addTraveler(0, "Max", "Mustermann", birthDay);
        offersPage.saveTraveler();

        // Get hints
        List<String> hints = offersPage.getShoppingCart().getHints();

        assertNotNull(hints);
        assertTrue(hints.size() == 1);
        assertEquals("A child can only travel under adult supervision", hints.get(0));
    }
}
The structure of a HTML Wrapper.
I suggest to create an abstract base class for all HTML wrappers. Let's call it HtmlWrapper. This class can provide some common methods, such as click, clickAndWaitUntil, findElement(s), getParentElement, getAttribute, isDisplayed, ... For editable elements, you can create a class EditableWrapper which inherits from the HtmlWrapper. This class can provide some common methods for editable elements, such as clear (clears the input), enter (presses the enter key), isEnabled (checks if the element is enabled), ... All editable elements should inherit from the EditableWrapper. Futhermore, you can provide two interfaces EditableSingleValue and EditableMultipleValue for single and multi value elements respectively. The next diagram demonstrates the idea. It shows the class hierarchy for three basic HTML wrappes:
Datepicker. It inherits from the EditableWrapper and implements the EditableSingleValue interface.
MultiSelect. It inherits from the EditableWrapper and implements the EditableMultiValue interface.
Message. It extends directly the HtmlWrapper because a message is not editable.

Do you want more implementation details for HTML wrappers? Details for an jQuery Datepicker can be found for example in this great article. The MultiSelect is a wrapper around the famous Select2 widget. I have implemented the wrapper in my project in the following way:
public class MultiSelect extends EditableWrapper implements EditableMultiValue<String> {

    protected MultiSelect(WebElement element) {
        super(element);
    }

    public static MultiSelect create(WebElement element) {
        assertNotNull(element);
        return new MultiSelect(element);
    }

    @Override
    public void clear() {
        JavascriptExecutor js = (JavascriptExecutor) getDriver();
        js.executeScript("jQuery(arguments[0]).val(null).trigger('change')", element);
    }

    public void removeValue(String...value) {
        if (value == null || value.length == 0) {
            return;
        }

        JavascriptExecutor js = (JavascriptExecutor) getDriver();
        Object selectedValues = js.executeScript("return jQuery(arguments[0]).val()", element);
        String[] curValue = convertValues(selectedValues);
        String[] newValue = ArrayUtils.removeElements(curValue, value);

        if (newValue == null || newValue.length == 0) {
            clear();
        } else {
            changeValue(newValue);
        }
    }

    public void addValue(String...value) {
        if (value == null || value.length == 0) {
            return;
        }

        JavascriptExecutor js = (JavascriptExecutor) getDriver();
        Object selectedValues = js.executeScript("return jQuery(arguments[0]).val()", element);
        String[] curValue = convertValues(selectedValues);
        String[] newValue = ArrayUtils.addAll(curValue, value);

        changeValue(newValue);
    }

    @Override
    public void setValue(String...value) {
        clear();
        if (value == null || value.length == 0) {
            return;
        }

        changeValue(value);
    }

    @Override
    public String[] getValue() {
        JavascriptExecutor js = (JavascriptExecutor) getDriver();
        Object values = js.executeScript("return jQuery(arguments[0]).val()", element);

        return convertValues(values);
    }

    private void changeValue(String...value) {
        Gson gson = new Gson();
        String jsonArray = gson.toJson(value);

        String jsCode = String.format("jQuery(arguments[0]).val(%s).trigger('change')", jsonArray);
        JavascriptExecutor js = (JavascriptExecutor) getDriver();
        js.executeScript(jsCode, element);
    }

    @SuppressWarnings("unchecked")
    private String[] convertValues(Object values) {
        if (values == null) {
            return null;
        }

        if (values.getClass().isArray()) {
            return (String[]) values;
        } else if (values instanceof List) {
            List<String> list = (List<String> ) values;
            return list.toArray(new String[list.size()]);
        } else {
            throw new WebDriverException("Unsupported value for MultiSelect: " + values.getClass());
        }
    }
}
And an example of Message implementation for the sake of completeness:
public class Message extends HtmlWrapper {

    public enum Severity {
        INFO("info"),
        WARNING("warn"),
        ERROR("error");

        Severity(String severity) {
            this.severity = severity;
        }

        private final String severity;

        public String getSeverity() {
            return severity;
        }
    }

    protected Message(WebElement element) {
        super(element);
    }

    public static Message create(WebElement element) {
        assertNotNull(element);
        return new Message(element);
    }

    public boolean isAnyMessageExist(Severity severity) {
        List<WebElement> messages = findElements(
      By.cssSelector(".ui-messages .ui-messages-" + severity.getSeverity()));
        return messages.size() > 0;
    }

    public boolean isAnyMessageExist() {
        for (Severity severity: Severity.values()) {
            List<WebElement> messages = findElements(
       By.cssSelector(".ui-messages .ui-messages-" + severity.getSeverity()));
            if (messages.size() > 0) {
                return true;
            }
        }

        return false;
    }

    public List<String> getMessages(Severity severity) {
        List<WebElement> messages = findElements(
      By.cssSelector(".ui-messages .ui-messages-" + severity.getSeverity() + "-summary"));
        if (messages.isEmpty()) {
            return null;
        }

        List<String> text = new ArrayList<> ();
        for (WebElement element: messages) {
            text.add(element.getText());
        }

        return text;
    }
}
The Message wraps the Message component in PrimeFaces.Conclusion: when you finished the writing of page objects and HTML wrappers, you can settle back and concentrate on the comfortable writing of Selenium tests. Feel free to share your thoughts.
Sunday, March 20, 2016
Promises in AngularJS. Part II. $q service.
I have already blogged about Promises in AngularJS 1.x. This is the second part which describes the Angular's $q service. The $q service can be used in two different ways. The first way mimics the Q library for creating and composing asynchronous promises in JavaScript. The second way mimics the ECMAScript 2015 (ES6) style. Let's begin with the first way. First of all, you have to create a deferred object by $q.defer().
The Plunker of this example is available here. Here is another picture that visualize the relation between methods of the deferred object:

As you can see, the asynchronous function doesn't return the deferred object directly. The reason for that is obvious. If the deferred object would be returned instead of deferred.promise, the caller of the asynchronous function could be able to trigger callbacks by invoking deferred.resolve(...), deferred.reject(...) or deferred.notify(...). For this reason these methods are protected from being invoking from outside by the caller.
The example above can be rewritten in the ECMAScript 2015 (ES6) style (I mentioned this way at the beginning). A promise in ECMAScript 2015 can be created as an instance of Promise object.
A Plunker example is available here. Keep in mind the difference between deferred.reject(...) and $q.reject(...). The call deferred.reject(...) puts the corresponding promise into the rejected state. The call $q.reject(...) creates a new promise which is already in the rejected state.
The second way to produce a rejection in success or error callbacks consists in throwing an exception with throw new Error(...).
But well, it works as designed and probably it is even an advantage to see thrown errors in the console.
There is also an opposite method $q.when(...) which returns an immediately resolved promise. The documentation says: $q.when(...) "wraps an object that might be a value or a (3rd party) then-able promise into a $q promise. This is useful when you are dealing with an object that might or might not be a promise, or if the promise comes from a source that can't be trusted." You can e.g. wrap an jQuery Deferred Object with $q.when(...) or simple write
Last but not least is the method $q.all(promises) where promises is an array of multiple promises. This call returns a single promise that is resolved when all promises in the given array gets resolved.
var deferred = $q.defer();A deferred object can be created within an asynchronous function. The function should return a promise object created from the deferred object as follows:
return deferred.promise;A promise is always in either one of three states:
- Pending: the result hasn't been computed yet
- Fulfilled: the result was computed successfully
- Rejected: a failure occurred during computation
deferred.resolve(...)
deferred.reject(...)
The first call deferred.resolve(...) puts the promise into the fulfilled state. As result a success callback will be invoked. The second call deferred.reject(...) puts the promise into the rejected state. As result an error callback will be invoked. It is also possible to invoke
deferred.notify(...)during the function's execution to propogate some progress from the asynchronous function to an update callback. All three callbacks can be registered on the promise as parameters of the function then:
var promise = someAsynchronousFunction();
promise.then(function(value) {
    // success
    ...
}, function(reason) {
    // failure
    ...
}, function(update) {
    // update
    ...
});
Let's implement an example. We will take setTimeout() as an asynchronous function. In the real application, you will probably use some other asynchronous services. In the setTimeout(), we will generate a random number after 1 sek. If the number is less than 0.5, we will invoke deferred.resolve(random), otherwise deferred.reject(random). The entire logic is implemented in the controller PromiseController.
var app = angular.module('app', []);
app.controller('PromiseController', PromiseController);

function PromiseController($q) {
    var _self = this;
    this.message = null;

    var asyncFunction = function() {
        var deferred = $q.defer();

        setTimeout(function() {
            var random = Math.random().toFixed(2);

            if (random < 0.5) {
                deferred.resolve(random);
            } else {
                deferred.reject(random);
            }
        }, 1000);

        return deferred.promise;
    }

    this.invokeAsyncFunction = function() {
        var promise = asyncFunction();

        promise.then(function(message) {
            _self.message = "Success: " + message;
        }, function(message) {
            _self.message = "Error: " + message;
        });
    }
}
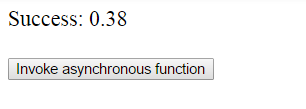
As you can see, the asynchronous function asyncFunction is invoked in the controller's method invokeAsyncFunction. The function asyncFunction returns a promise. In the success case, the promise gets fulfilled and the first registered success callback gets executed. In the error case, the promise gets rejected and the second registered error callback gets executed. The invokeAsyncFunction is bound to the onclick event on a button.
<!DOCTYPE html>
<html>
<head>
    <meta charset="utf-8" />
    <meta content="IE=edge" http-equiv="X-UA-Compatible" />
    <script src="https://code.angularjs.org/1.4.8/angular.js"></script>
</head>

<body ng-app="app" ng-controller="PromiseController as ctrlPromise">
    <div ng-bind="ctrlPromise.message"></div>
    <p></p>
    <button ng-click="ctrlPromise.invokeAsyncFunction()">
        Invoke asynchronous function
    </button>

    <script src="controller.js"></script>
</body>
</html>
The message in GUI looks like as follows (success case as example):The Plunker of this example is available here. Here is another picture that visualize the relation between methods of the deferred object:
As you can see, the asynchronous function doesn't return the deferred object directly. The reason for that is obvious. If the deferred object would be returned instead of deferred.promise, the caller of the asynchronous function could be able to trigger callbacks by invoking deferred.resolve(...), deferred.reject(...) or deferred.notify(...). For this reason these methods are protected from being invoking from outside by the caller.
The example above can be rewritten in the ECMAScript 2015 (ES6) style (I mentioned this way at the beginning). A promise in ECMAScript 2015 can be created as an instance of Promise object.
var promise = new Promise(function(resolve, reject) {
    ...
    if(...) {
        resolve(value); // success
    } else {
        reject(reason); // failure
    }
});
Our asyncFunction function looks in this case as follows:
var asyncFunction = function() {
    return $q(function(resolve, reject) {

        setTimeout(function() {
            var random = Math.random().toFixed(2);

            if (random < 0.5) {
                resolve(random);
            } else {
                reject(random);
            }
        }, 1000);
    });
}
The remaining code stays unchanged. Let's go on. The next question is, how can we produce a rejection in success or error callbacks? For instance, you check some condition in a callback and want to produce an error if the condition is not fulfilled. Sometimes, we also want to forward rejection in a chain of promises. That means, you catch an error via an error callback and you want to forward the error to the promise derived from the current promise. There are two ways to achieve this qoal. The first one consists in using the $q.reject(...) like shown below.
var promise = someAsynchronousFunction();
promise.then(function(value) {
    // success
    ...
    if(someCondition) {
        $q.reject("An error occurred!");
    }
}, function(reason) {
    // failure
    ...
}).catch(function(error) {
    // do something in error case
    ...
});
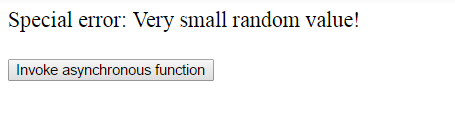
In our example, we will adjust the function invokeAsyncFunction in order to check very small values (smaller than 0.1).
this.invokeAsyncFunction = function() {
    var promise = asyncFunction();

    promise.then(function(random) {
        if (random < 0.1) {
            return $q.reject("Very small random value!");
        }

        _self.message = "Success: " + random;
    }, function(random) {
        _self.message = "Error: " + random;
    }).catch(function(error) {
        _self.message = "Special error: " + error;
    });
}
A Plunker example is available here. Keep in mind the difference between deferred.reject(...) and $q.reject(...). The call deferred.reject(...) puts the corresponding promise into the rejected state. The call $q.reject(...) creates a new promise which is already in the rejected state.
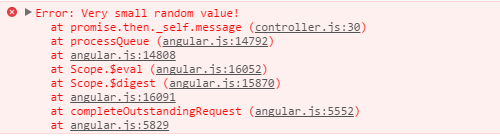
The second way to produce a rejection in success or error callbacks consists in throwing an exception with throw new Error(...).
this.invokeAsyncFunction = function() {
    var promise = asyncFunction();

    promise.then(function(random) {
        if (random < 0.1) {
            throw new Error("Very small random value!");
        }

        _self.message = "Success: " + random;
    }, function(random) {
        _self.message = "Error: " + random;
    }).catch(function(error) {
        _self.message = "Special error: " + error;
    });
}
AngularJS will catch the exception, create a promise in the rejected state and forward it to the next block in the chain of promises. In the example, the error will be forwarded to the catch block. One downside of this approach with throw new Error(...) is that the error will be logged in the console. Picture from the Chrome Dev Tools:But well, it works as designed and probably it is even an advantage to see thrown errors in the console.
There is also an opposite method $q.when(...) which returns an immediately resolved promise. The documentation says: $q.when(...) "wraps an object that might be a value or a (3rd party) then-able promise into a $q promise. This is useful when you are dealing with an object that might or might not be a promise, or if the promise comes from a source that can't be trusted." You can e.g. wrap an jQuery Deferred Object with $q.when(...) or simple write
$q.when("Finished!").then(
    function handleResolve(value) {
        console.log("Resolved with value: ", value);
    }
);
and see Resolved with value: Finished! in the console. The alias of $q.when(value) is $q.resolve(value). This was introduced later in order to maintain naming consistency with ECMAScript 2015.Last but not least is the method $q.all(promises) where promises is an array of multiple promises. This call returns a single promise that is resolved when all promises in the given array gets resolved.
var promise1 = someAsynchronousFunction1();
var promise2 = someAsynchronousFunction2();

$q.all([promise1, promise2]).then(function(result) {
    console.log("Promises " + result[0] + " and " + result[1] + " finished their work successfully");
});
As you can see, the result passed into the callback function is an array of two outcomes - the outcome of the first and the outcome of the second callback.
Subscribe to:
Posts (Atom)